Aids For Finding Stars
more of EdsStuff
Most people will long ago have picked their favorite star finding aids, but in case there are a few coming to AHSP who are just starting out, here's a partial list.
The modern winner is the one that fits in your pocket and does not require a flashlight. The free App Stellarium can be put in red display night view mode to preserve eye dark adaption. But start with setting your display brightness and turning off your screen's auto-lock setting so that you won't have to look at a bright screen to wake up your device. Laminated foldouts will also fit in a (large) pocket. They're 4.5"x8.5" folded, opening to 4.5"x19.25".
• Stellarium Mobile, for hand helds: App Store or Google Play
• Stellalrium for computers: stellarium.org (Stellariium skeystrokes krib sheet)
• Monthly sky charts: KenPress.com
• Seasonal sky charts: Ch. 4, KnightWatch by Terence Dickinson
• Star Wheels, Planispheres, Foldouts: (do search for "star wheel," not "star wheels")
| Type | By | Size | Bkgd | Material | Objects? |
| star wheel | you make | ~7x7 | bl / w | your paper | no |
| star wheel | Sky & Tel | 7½x7½ | black | tough paper | no |
| star wheel | Sky & Tel | 10¾x10¾ | black | tough paper | many |
| star wheel | Graun | 16x16 | white | plastic | many |
| planisphere | Chandler | 8½/x10 | white | plastic | some |
| foldout | of stars | 4x8.5/19 | white | plastic | some |
| foldout | of Messier | 4x8.5/19 | white | plastic | Messier |
• This EZStars.info is a tutorial interactive version of Cartesian.
• Telrad finder, Rigel finder, Red Dot finder, finder scope
• Go-To easy once aligned. Point telescope without touching it.
• Red night vision flashlights: fixed, adjustable1, adjustable2
Ranking of Star Wheels and Charts:
Get and use Stellarium first, both versions, and do some web browsing. Part of modern amateur astronomy is just appreciating the awesome photography and astrophysics from Hubble class telescopes and maybe also learning where in the heavens these pictures came from.
It takes a year of occasionally going out in the evening to watch the stars go by and maybe two years to build a solid memory for how the celestial sphere fits together. We assume here that you are located at a northern latitude as in the US. Then there are two regions of the celestial sphere to keep in mind - 1) the northern view which is circular and rotates around Polaris, and 2) the southern view which is essentially a cylinder. It's the celestial sphere less cones around the polar directions and extends from a little north of your zenith down to Scorpio and Sagittarius. The mental map you build of time progression is essentially an x-y plot of this cylinder as in the next link.
Foldouts display these two views as distinctly separate. Star wheels and planispheres blend the two views together making a little confusion about how to hold the device. It's instructive to eventually learn how to use these wheels with the periphery cut off to make them smaller. The outer half of a trimmed-off wheel is similar to the x-y plot of a foldout, both giving the time progression of constellations and stars during the year.
Black background is better than white for maintaining eye dark adaption. Plastic or well laminated is needed for withstanding dew. Big can show more detail with some deep-space objects. You can write in and erase your own with felt pen on white plastic but not on the black star wheels.
After Stellarium, start with a red flashlight and the smaller Sky & Telescope star wheel, a KenPress monthly sky chart or maybe the foldout of stars. If you are beginning to use a telescope, you'll need to put things down on the wet grass, so though it opens to large size, the foldout that fits in a hip pocket is convenient.
To trim the size of a star wheel or planisphere start by using pliers to crimp shrink the central ring rivet so that it comes out without tearing anything. Then use scissors to trim off the outer periphery of month-day indicators on the star wheel. Get the hang of it, and you can throw away the holder part that bounds what you can see on the star wheel. Just look at the starry sky. The horizon boundary of what you can see is already there, and your star wheel is smaller without the cover.
Initialization of Stellarium on Computers:
The two most desirable settings are to make Stellarium come up using your location and to make it show the evening sky for, say 10:30 pm, even if you are booting in the daytime. The user interface for saving your settings for these is very different and potentially confusing.To set the default time use the "Configuration window," go to subwindow "Navigation" and set "System Date" to 10:30 pm. Then to save this setting you must also go back to the "Main" subwindow and click "Save settings."
To set the default location use the "Location window." A very long list of locations is displayed. One and only one of them can have the check box selected to be "Use current location as default." (Better wording would be "Use this location as default.") You can scroll through the list or do a text search to find the location nearest to you. Then check the box for "Use current location as default." Now closing the window saves your setting. This won't be exactly your location, but it's good enough, especially in suburbs where you can't see much near the horizon anyhow.
|
You can get into trouble if you choose to enter your location more exactly. If you make a mistake, which is easy when entering degree, minutes and seconds, you may find that the "Delete from list" button does not work. This is because the list of locations displayed in Stellarium's "Location window" is a combination of what is in two files - your entries and Stellarium's built-in list of locations. The delete button can be applied only to your entries.
If you want to have your own custom location or a short list of just your locations, you don't want Stellarium to find its built-in file. It's a compressed file called base_locations.bin.gz and changing the name to something like base_locations.binX.gz will work. For PC's versus Mac's the file is located at
And if you make a mistake entering all those degrees, minutes and seconds, it may be easier not to use the Stellarium "Location" window to fix it. Your user account file has az el entered as decimal degrees, and it's just a tab-deliminated text file. On mac it's located at
|
Representing the Celestial Sphere:
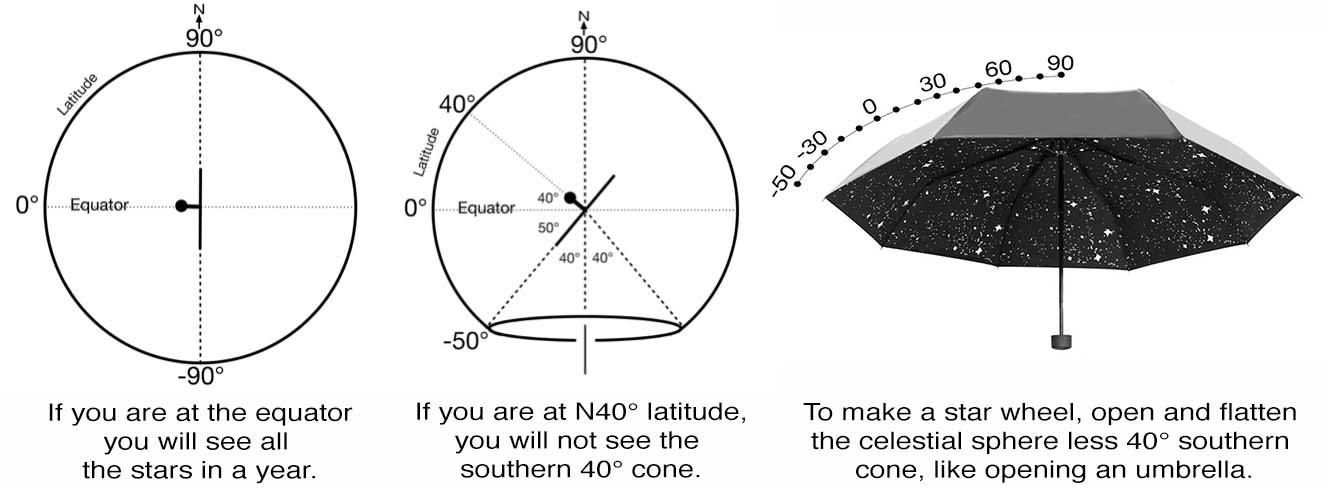
A star wheel for use at northern latitudes like the US is made by opening up and flattening the celestial sphere less a 40° cone in the southern direction that can not be seen. See you-make star wheel above.
A planisphere is formed similarly but by doing less flattening, twice. The northern celestial hemisphere plus 20° below the equator is flattened and put on the front side of the wheel. The southern celestial hemisphere plus 20° above the equator is flattened and put on the back side of the wheel. This reduces distortion at the price of the user having to get used to flipping the planisphere when viewing stars below the equator.
A monthly sky chart uses the least flattening - of just the half of the celestial sphere that is overhead at about 10:30 in the evening.
Simplest in principle is the Cartesian x-y display for a foldout. This leaves out two cones, around both the northern and southern directions, flattens the remaining part of the celestial sphere onto a cylinder and then displays that with latitude for the y axis and right ascension for the x axis. Unlike a star wheel, the foldout does not cover the part of the sky that you can't see at a particular time. This EZStars.info is a tutorial interactive version of the Cartesian display.
Missing Products:
Accurate Star Umbrella: Star and constellation umbrellas are available, but not like the one depicted above for amature astronomers. It would be nice to have stars and constellations depicted fairly accurately on the inside of the umbrella for declinations down to 50° below the equator. The products available cost about $23 and emphasize the 12 zodiac constellations, which are not the main ones you can pick out in the sky. This Black Tape Sunshade doesn't even have good pattern matching at the sewn seams. The 2017 Creative Automatic here or here looks better, but requires you to join and give your credit card information to an overseas web site.Accurate Smart Phone for Push-To: Stellarium Mobile displayed on a smart phone mechanically attached and software aligned on an aluminum telescope would in principle be both an instructive and a convenient way for manually directing the telescope to point at deep space objects, without depending on batteries or slow motors. But the compass and elevation sensors in today's smart phones apparently aren't good enough.